Planning a wedding can feel like a beautiful whirlwind. You’re probably dreaming about every little detail, from the venue to the flowers. But let’s not forget one of the most crucial aspects: your nails. After all, you’ll be showing off that stunning ring, and your hands will be in the spotlight all day. If you’re feeling overwhelmed by all the options, you’re not alone. That’s why I created this post about wedding nail art ideas.
If you’re a bride-to-be, a bridesmaid, or simply someone who loves all things bridal, this post is for you! Whether you prefer classic elegance or something more whimsical, you’ll find inspiration that speaks to your style. I’ve gathered 21 dazzling nail art ideas that are stunning, creative, and perfect for your big day. From timeless French tips to bold colors and intricate designs, there’s something here for everyone.
Get ready to find the perfect nail art for your wedding! Each idea is not just about looking good; it’s about embracing your personality and making a statement. By the end of this post, you’ll be equipped with all the ideas you need to make your wedding day even more memorable.
Key Takeaways
– Explore 21 creative wedding nail art ideas ranging from classic to modern styles that will suit every bride’s taste.
– Discover various themes like floral elegance and vintage-inspired designs that resonate with different wedding themes.
– Learn about popular techniques such as ombre, watercolor effects, and marbled designs to elevate your nail game.
– Find tips on personalizing your nails with unique shapes and initials for a touch of individuality.
– Get inspired by seasonal and bold color trends to ensure your nails match your wedding’s color palette beautifully.
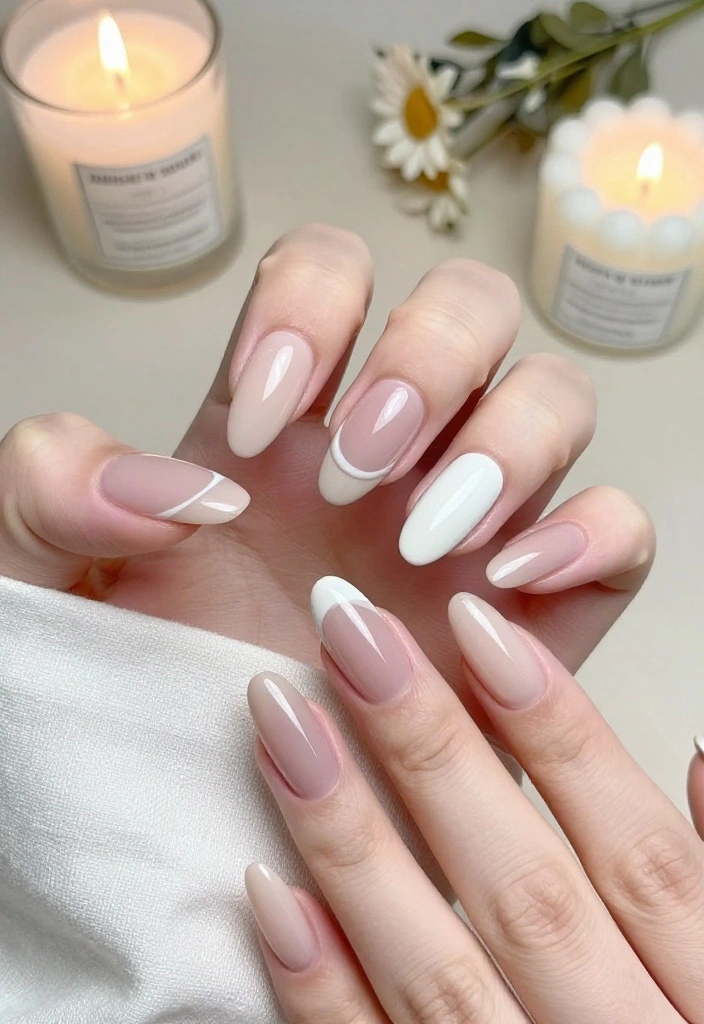
1. Classic French Tips with a Twist
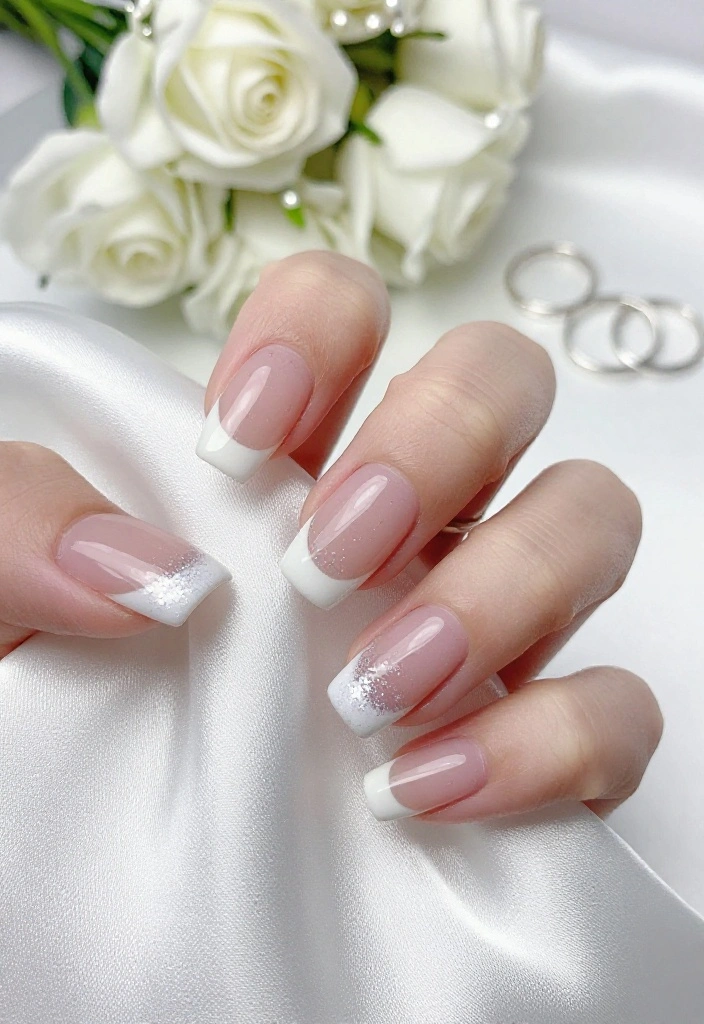
Classic French tips are always in style, but adding your personal touch makes them stand out. Imagine a gentle pastel base paired with glittery white tips that bring a modern sparkle to this timeless look. This combination not only looks elegant but also complements your wedding theme beautifully, making your nails a delightful part of your special day.
To achieve this look, consider experimenting with various tip shapes, such as a diagonal or rounded finish. This simple change can elevate your nails and create a cohesive appearance with your soft white bouquet.
Key Tips:
– Select colors that enhance your overall wedding palette.
– Ensure nails are well-shaped for a polished finish.
– Opt for gel or acrylics for a long-lasting effect.
📹 Related Video: 10 WAYS TO CREATE FRENCH TIPS MANICURES | GIVEAWAY WINNERS | HOW TO BASICS | NAIL ART
2. Floral Elegance
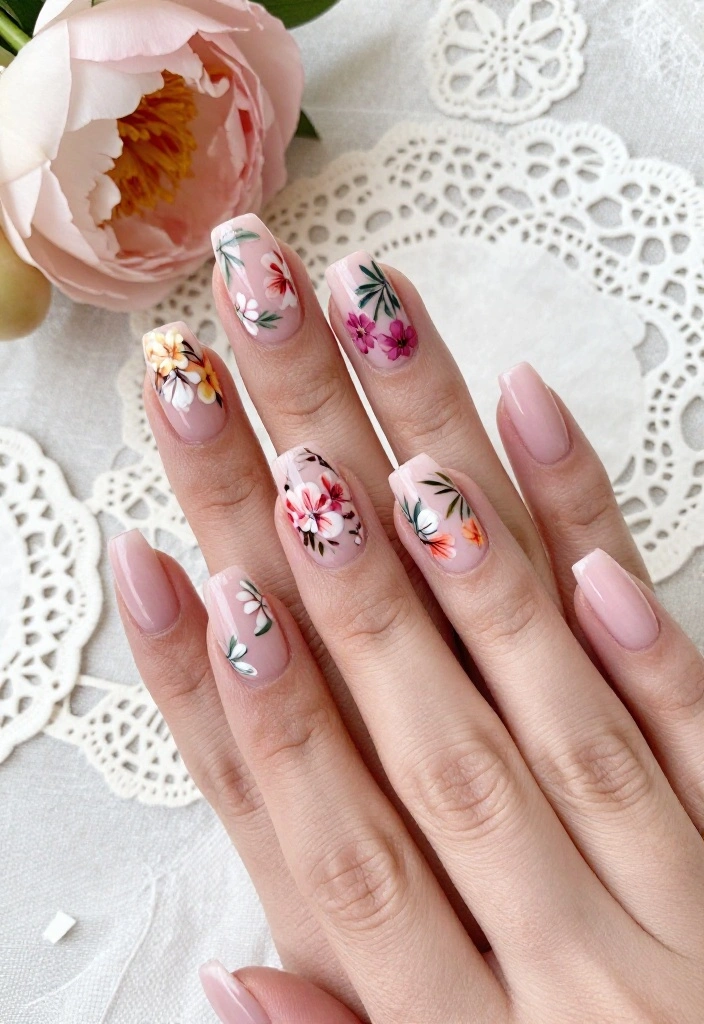
Floral designs bring a romantic touch to your wedding nails, making them a lovely choice. Think about using a soft nude or light pink base to let hand-painted flowers, like delicate peonies or roses, shine. This charming style can be further enhanced with gold or silver leaf accents, adding a hint of luxury to your look.
You can customize the floral design to reflect your personality, whether you prefer a subtle touch or vibrant blooms. This versatility means you can create a look that perfectly aligns with your bridal style.
Key Tips:
– Match your floral designs with the flowers in your bouquet.
– Experiment with varying flower sizes for an eye-catching effect.
– Finish with a top coat to safeguard your intricate designs.
How To Choose The Right Wedding Nail Art
Choosing the perfect wedding nail art can be an exciting but overwhelming task. With so many styles to explore, it’s essential to find the right design that reflects your personality and complements your wedding theme. Here are some key criteria to help you make the best choice for your special day.
1. Consider Your Wedding Theme
Think about the overall vibe of your wedding. Are you going for a classic, bohemian, or modern look? Your nail art should align with this theme. For example, if you’re having a rustic wedding, floral designs or warm colors might work best. If it’s a glamorous event, consider elegant gold accents or glittery designs. Matching your nails to your wedding theme will create a cohesive look that ties everything together.
2. Think About Your Dress
Take a close look at your wedding dress. The color, fabric, and embellishments can influence your nail art choice. If your dress features intricate lace or beadwork, you might want to opt for a minimalist nail design that won’t compete with it. Alternatively, if your dress is simple, you can have fun with bold colors or patterns. Keep your dress in mind to ensure your nails enhance, rather than detract from, your bridal look.
3. Choose a Style That Reflects You
Your nails are a reflection of your style. Do you prefer classic chic or vibrant and playful? If you have a favorite color or design, incorporate it into your wedding nail art. Whether it’s elegant French tips or whimsical cartoon illustrations, make sure it feels authentic to you. After all, you want to feel confident and beautiful on your big day.
4. Think About the Season
The season of your wedding can greatly influence your nail art design. Spring is perfect for pastel colors and floral patterns, while summer can showcase bright, bold hues. Fall might lend itself to rich jewel tones, and winter could call for icy blues or deep reds. Let the season inspire your nail art to create a harmonious overall look.
5. Consider Your Lifestyle
Keep in mind your daily routine when choosing your wedding nail art. If you lead a busy life, opt for designs that are low-maintenance and durable. Glitter or gel nails can last longer and withstand more wear and tear. If you’re someone who frequently changes your nail art, consider a design that can be easily modified post-wedding.
6. Set a Budget
Nail art can vary in cost depending on the complexity of the design and the materials used. Establish a budget before you start exploring options. Some styles, like intricate hand-painted designs, might be more expensive. You can also consider DIY options if you’re crafty. Don’t forget to factor in the cost of manicures and touch-ups leading up to your wedding day.
Pro Tip: Schedule a trial run for your nail art a few weeks before the wedding. This gives you a chance to see how the design looks and feels. You can make adjustments if needed and ensure everything is perfect for your big day. A trial helps you feel more confident about your choice and provides peace of mind.
3. Glimmering Gold Accents
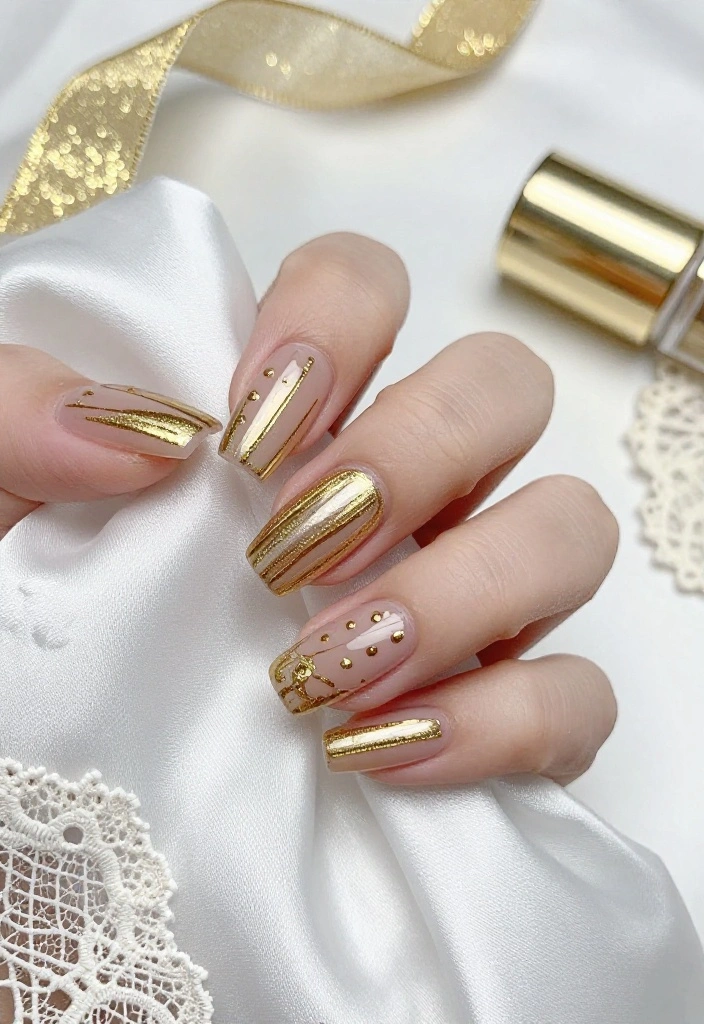
Gold accents add a luxurious elegance to your wedding nails that is hard to resist. Think about a solid white or nude base adorned with gold stripes, dots, or tiny hearts for a chic design that balances simplicity with glamour. This look is perfect for brides who want a touch of sparkle without going overboard.
To elevate the design even more, consider using gold foil pieces that add texture and luxury. This modern twist can make your nails truly shine on your special day.
Key Tips:
– Ensure metallic colors are vibrant to catch the light beautifully.
– Use a fine brush for detailed designs.
– Consider a matte base for a contemporary contrast with glossy gold accents.
4. Ombre Delight

Ombre nails are a stunning choice that offers versatility for your wedding look. You can blend soft pastel shades for a gentle fade or choose bold colors that represent your wedding theme. A beautiful transition from light pink at the base to a deeper rose at the tips creates a gorgeous gradient effect.
Adding a touch of glitter at the tips can give a magical sparkle that catches the light beautifully as you move. This design is ideal for brides looking to showcase both elegance and fun.
Key Tips:
– Use a makeup sponge for a seamless ombre effect.
– Seal your nails with a top coat for lasting shine.
– Practice color combinations to find your perfect match.
Fun fact: Ombre nails with soft pastels are up 38% this wedding season for weddinails. This gentle fade from base to tip makes a subtle statement, especially with a hint of glitter.
Ombre Delight
Editor’s Choice


5. Minimalist Chic
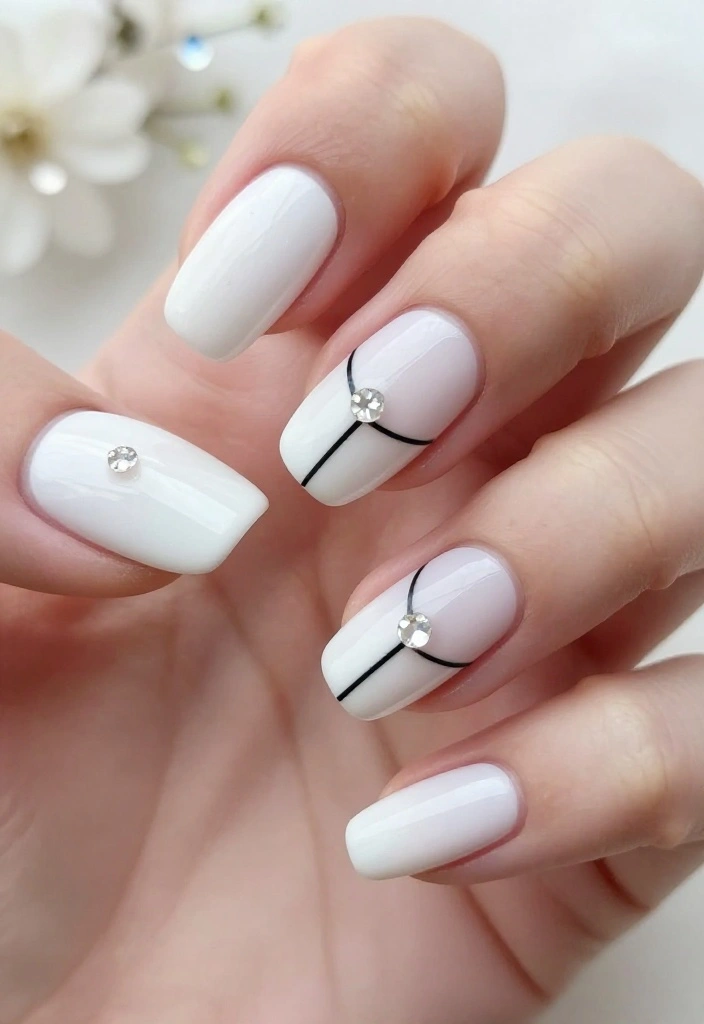
Minimalist nail art is perfect for brides who appreciate simplicity with style. A clean white base paired with a single thin line or geometric shapes in black or gold creates a modern look that is both sophisticated and easy to maintain. This design complements a sleek bridal gown beautifully, enhancing your polished appearance.
Shorter nails can also embody this minimalist style, allowing for a chic yet understated elegance. You’ll love how easy it is to keep this look fresh throughout your wedding day.
Key Tips:
– Keep nails well-groomed and neatly trimmed for the best effect.
– Choose shorter nails to enhance the minimalist approach.
– Use high-quality polish for a lasting, flawless finish.
Minimalist Chic
Editor’s Choice


6. Delicate Lace Patterns
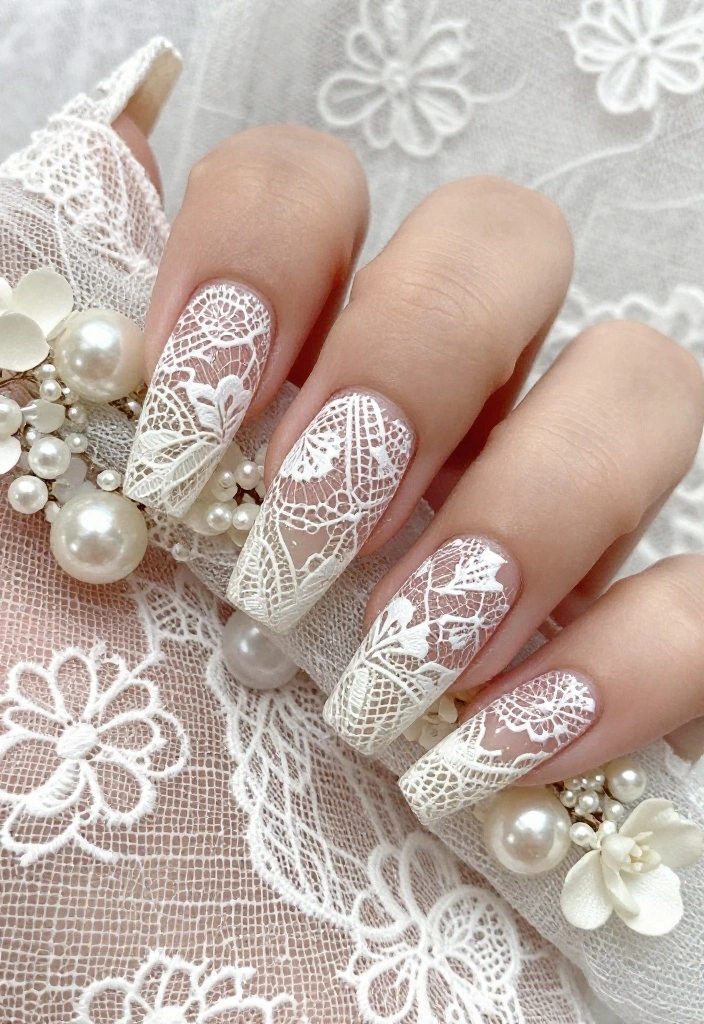
Lace patterns add a touch of romance and elegance to your wedding nails, perfectly fitting for brides. Consider intricate white lace designs over a nude base, mimicking the details of your wedding dress. This delicate look can be achieved with nail stamping or hand painting for stunning results.
Lace nail art enhances not only your nails but also harmonizes with the overall bridal aesthetic. It’s a beautiful way to tie in the intricate details of your wedding.
Key Tips:
– Practice intricate lace designs on fake nails before the big day.
– Opt for a matte top coat for a subtle finish.
– Use a fine brush for crisp, delicate lace details.
7. Sparkling Glitter Gradients
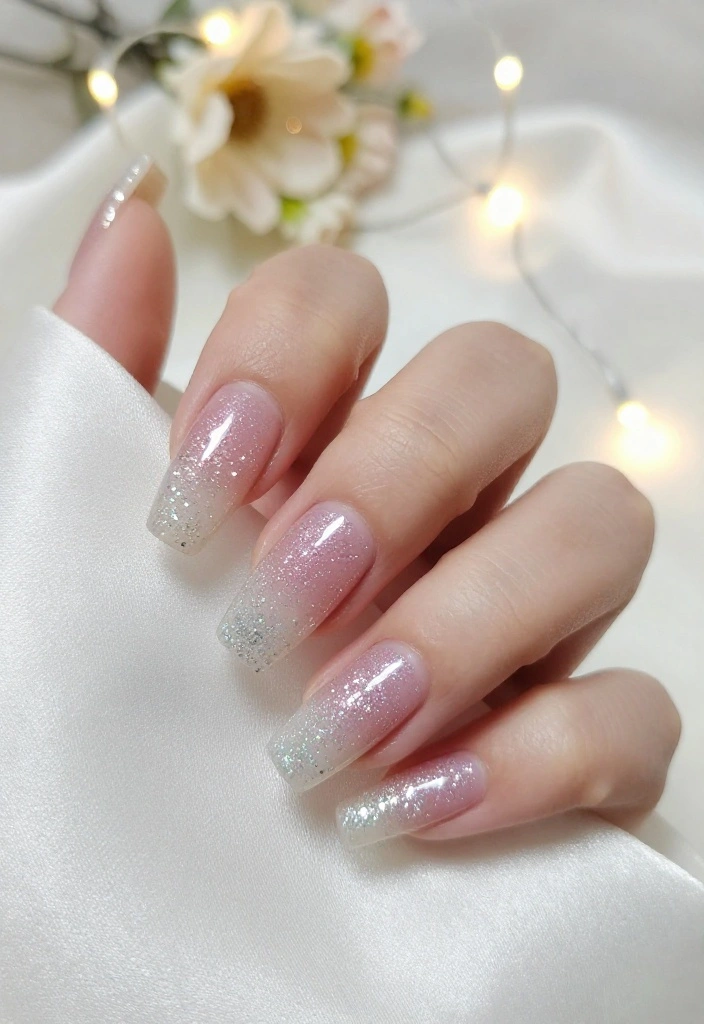
Glitter gradients are a playful and fun way to add sparkle to your wedding nails. Start with a clear or soft pastel base and gradually apply glitter, increasing its density towards the tips for a stunning effect. This design allows you to showcase your personality through different glitter colors while creating a radiant look.
It’s a beautiful way to catch the light and draw attention to your hands on your special day.
Key Tips:
– Layer glitter for a more intense sparkle.
– Use fine glitter for a smoother finish.
– Seal with a gel top coat to prevent chipping.
8. Whimsical Cartoon Illustrations
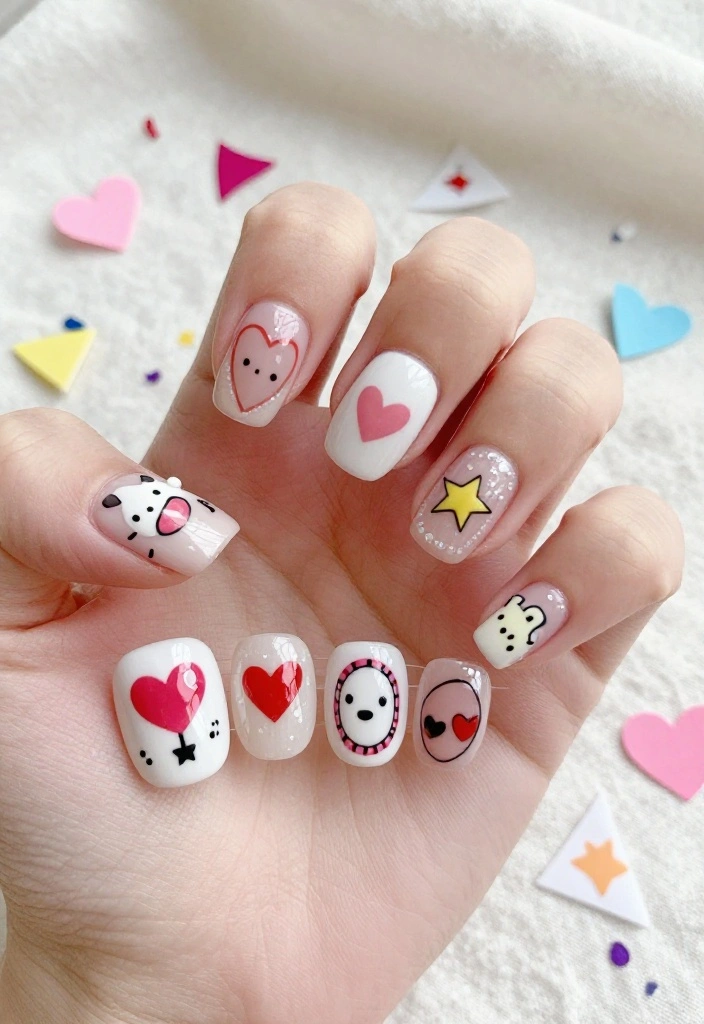
If you have a playful side, whimsical cartoon illustrations can add a personal touch to your wedding nails. Choose cute designs like hearts, stars, or even caricatures that reflect your unique love story. This playful style allows you to showcase your personality while keeping your bridal look fun and lively.
Make sure to use a soft color palette that aligns with your wedding theme for a cohesive appearance.
Key Tips:
– Select simple designs for easy application.
– Use bright yet pastel colors for harmony.
– Consider incorporating your wedding date or initials in a fun way.
9. Vintage-Inspired Designs
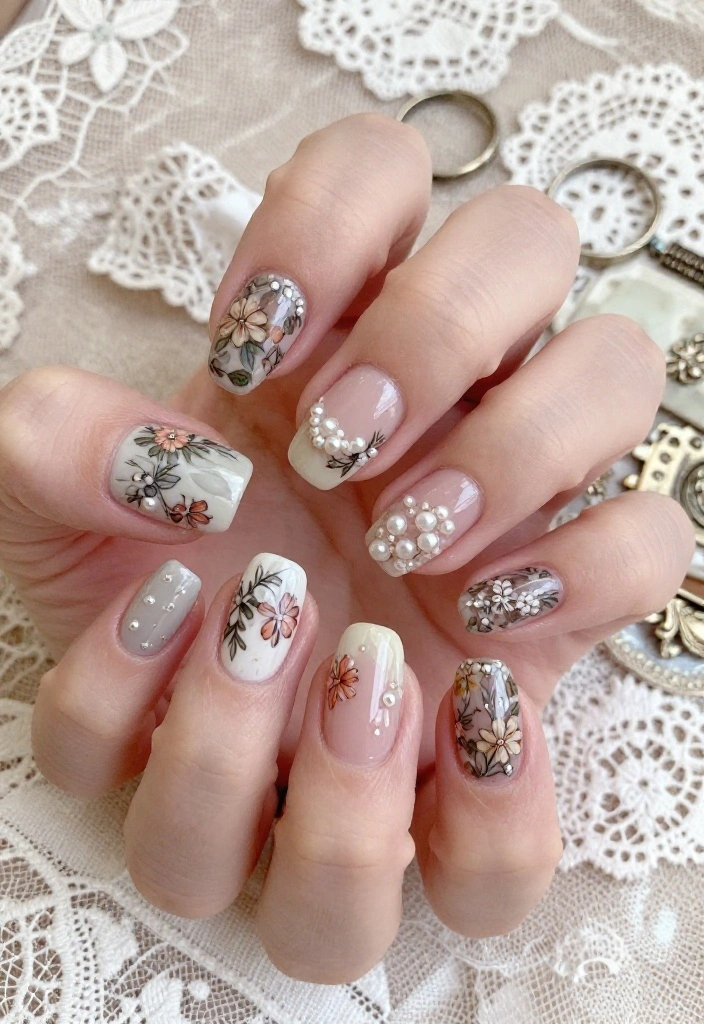
Vintage nail art adds charm and nostalgia, making it perfect for a vintage-themed wedding. Think of soft colors combined with intricate floral or damask patterns that evoke a bygone era. These designs can be elaborate, featuring lace, pearls, and muted tones that create a classic bridal vibe.
Adding metallic tones can enhance the opulence of this look, ensuring your nails reflect the elegance of the occasion.
Key Tips:
– Search for vintage patterns for inspiration.
– Match your nail art with your vintage dress for a cohesive style.
– Use a glossy top coat to highlight the vintage charm.
You might also like

10. Watercolor Effects
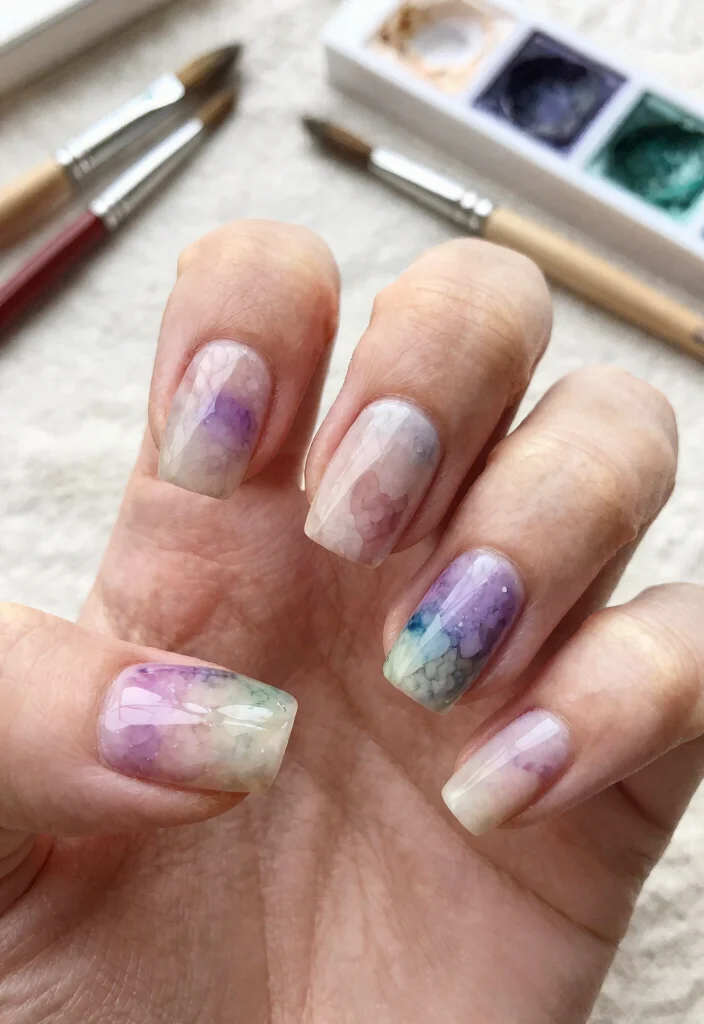
Watercolor nail art offers a stunning blend of colors that resembles a beautiful painting. Select colors that reflect your wedding palette and softly blend them across the nail for a dreamy look. Adding shimmer or glitter can elevate the design, making it even more special for your big day.
This artistic approach is unique, ensuring your nails catch the eye and create a memorable impression.
Key Tips:
– Use a thin brush or sponge for smooth color blending.
– Seal with a top coat for durability.
– Practice on a nail wheel before the wedding for better results.
Fun fact: 75% of brides say watercolor nails photograph best in soft, romantic hues. Pro tip: start with a sheer base, dab colors with a thin brush, and blend gently for a dreamy finish that elevates your weddinails for the big day.
11. Bold and Bright Colors
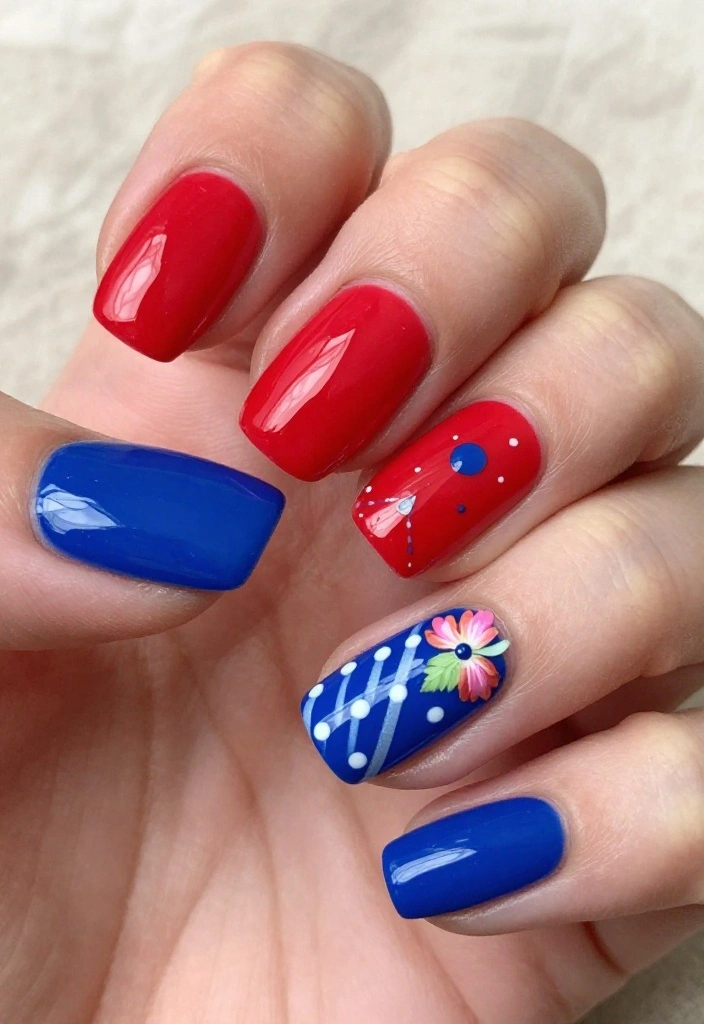
Embrace bold colors on your wedding day and let your nails shine! Vibrant reds, deep blues, and rich purples can create a striking contrast against a simple bridal gown. Pairing these bold hues with minimal designs like dots or stripes can balance the look and add elegance.
This daring design is perfect for a colorful celebration, allowing you to express your unique style.
Key Tips:
– Choose colors that resonate with your personal taste.
– Ensure the colors pop against your gown for maximum impact.
– Use high-quality polish for the best finish.
12. Seasonal Inspirations
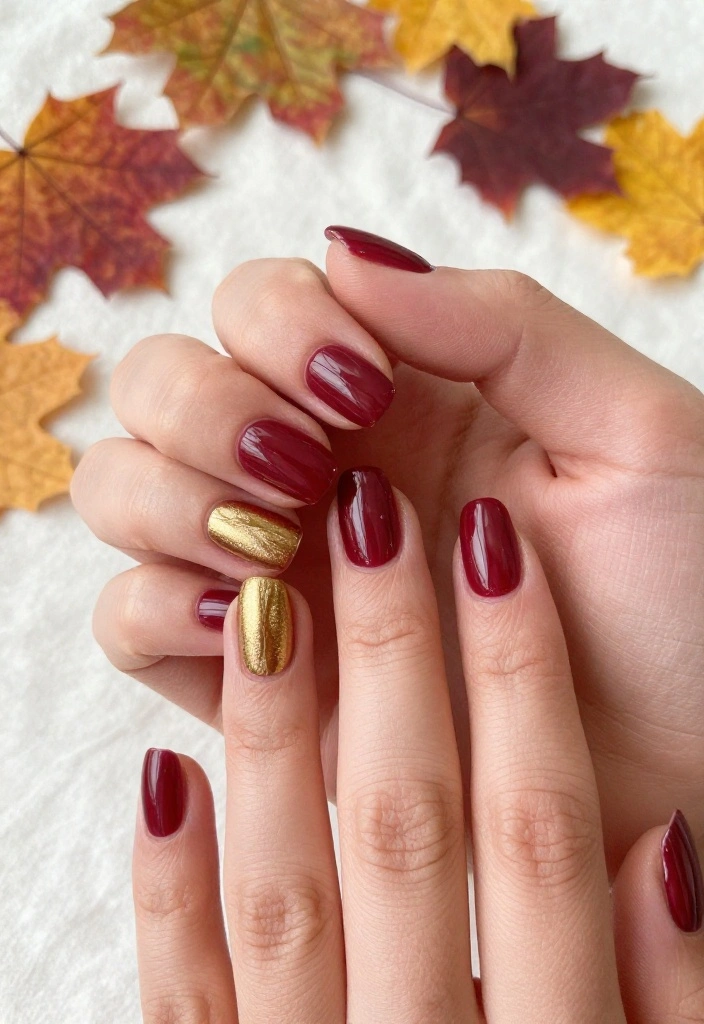
Let the season of your wedding inspire your nail art! For summer, think bright floral designs; for fall, incorporate rich oranges and burgundies. Winter weddings can embrace icy blues and whites with lovely snowflake designs, while spring can feature soft pastels and blooming flowers.
Seasonal nail art beautifully reflects the atmosphere of your special day, creating a memorable and cohesive look.
Key Tips:
– Use seasonal colors and designs that match your bouquet.
– Keep the overall aesthetic consistent with your wedding theme.
– Experiment with seasonal accents like leaves or snowflakes.
Seasonal Inspirations
Editor’s Choice


13. Artistic Abstracts

For the creative bride, abstract nail art makes a bold statement. Think swirling colors, geometric shapes, or splashes that allow for artistic expression while remaining elegant. This design can be personalized to reflect your unique style while harmonizing with your bridal theme.
Using colors that complement your wedding will create a stunning and cohesive look.
Key Tips:
– Use tape for geometric designs to enhance precision.
– Be adventurous with your color choices and artistry!
– Seal with a glossy top coat for lasting durability.
Fun fact: Brides using weddinails with abstract art report a 40% boost in photo wow-factor when the palette mirrors the wedding colors. Swirls, geometric shapes, and color blocks read as elegant, cohesive accents across all wedding-day shots.
14. Statement Accent Nails
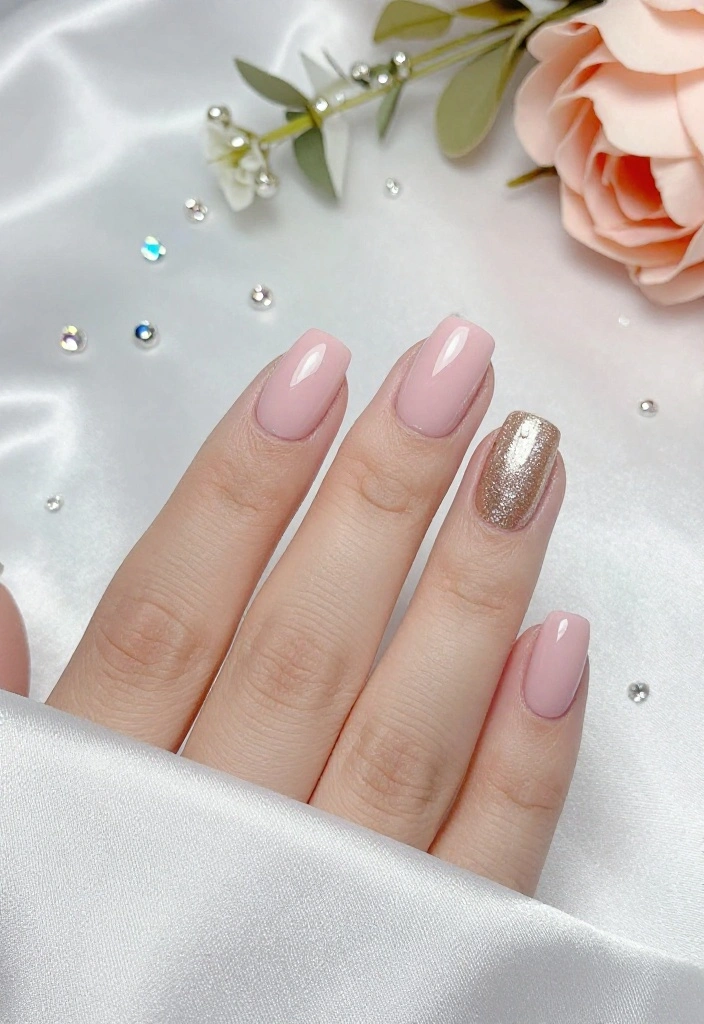
If your wedding style leans towards subtlety, consider an accent nail on a neutral base. All nails can be a soft pale pink, with one adorned in shimmering gold or embellished with rhinestones. This understated yet striking look allows the accent to shine without overwhelming your overall design.
It’s a chic way to incorporate flair while keeping your nails elegantly simple.
Key Tips:
– Choose an accent that complements your overall design.
– Keep the accent nail well-maintained for maximum impact.
– Experiment with textures for the accent nail to add interest.
15. Unique Shapes
Nail shape significantly impacts the overall appearance of your wedding nails. Consider styles like almond, stiletto, or coffin shapes that can add character and flair. Bold shapes can stand out even with the simplest color choices, making your nails a focal point.
Remember, shorter nails can also be stylish, so don’t feel pressured to go long if that’s not your preference!
Key Tips:
– Choose a shape that feels comfortable for you.
– Ensure your nails are well-filed and shaped for an elegant finish.
– Consider your wedding theme when selecting your nail shape.
16. Personalized Initials
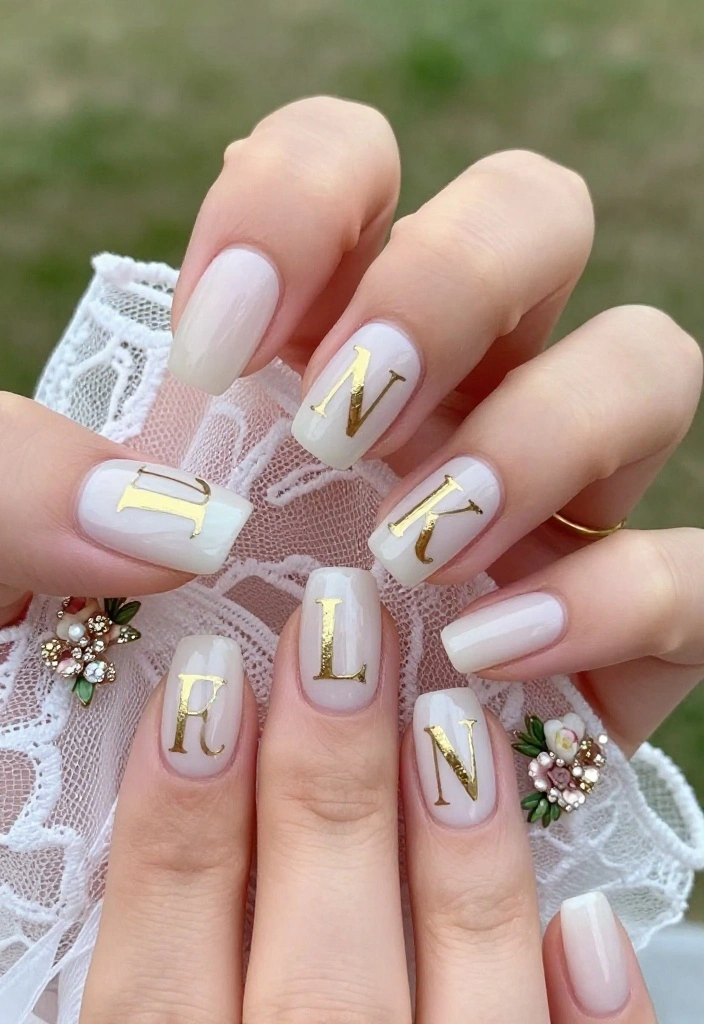
Adding your initials or your partner’s initials can create a special touch for your bridal nails. Opt for a simple solid base and add your initials on one or two nails using a contrasting or metallic color. This personal detail makes for a beautiful keepsake after the wedding, symbolizing your love.
It’s a subtle yet meaningful way to make a statement on your special day!
Key Tips:
– Keep the initials small and simple for an elegant effect.
– Match the initials with your overall nail design for cohesion.
– Decide on the placement of the initials, whether on the tip or base of the nail.
You Might Also Like
17. Metallic Foil
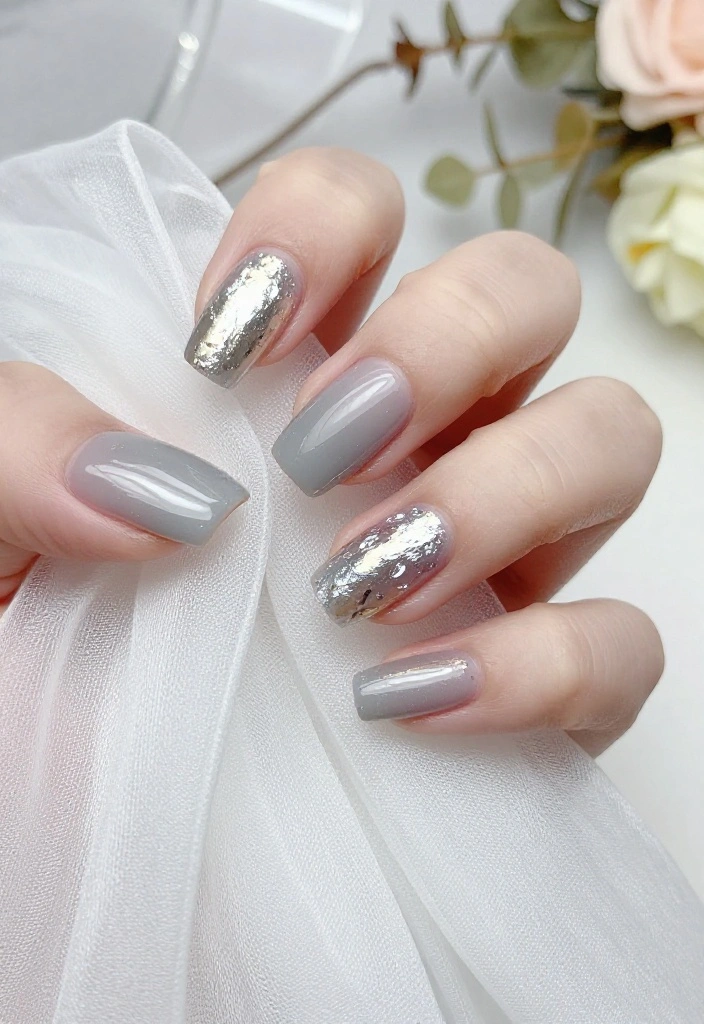
Metallic foil adds a luxurious flair to your wedding nails. Start with a solid color base and apply foil accents to create stunning effects like stripes or abstract patterns. Gold and silver foils look particularly striking against darker shades but can also pop beautifully against lighter colors!
This eye-catching design is perfect for the modern bride looking to elevate her style.
Key Tips:
– Ensure the base color is completely dry before applying foil.
– Use a top coat to seal the design and maintain its shine.
– Experiment with different placements for unique visual effects.
18. Jewel-Toned Beauty
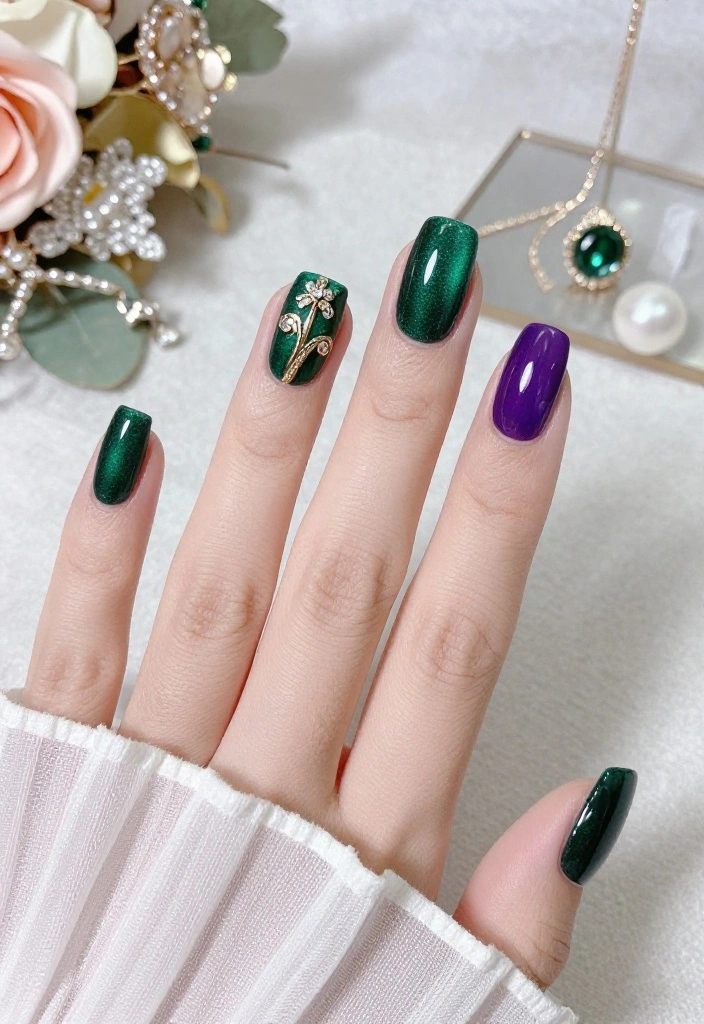
Jewel tones offer a rich and luxurious feel that can enhance your bridal look. Deep emeralds, royal blues, and rich purples create a gorgeous backdrop for elegant designs like gold stamping or glitter accents. This bold choice can make your nails pop vividly, especially in photographs!
Consider color depth that aligns with your wedding aesthetic for a beautifully cohesive appearance.
Key Tips:
– Choose jewel tones based on your wedding color scheme.
– Pair with neutral accents to let the colors shine through.
– Ensure a smooth finish with a glossy top coat for an impeccable look.
19. Marbled Effect
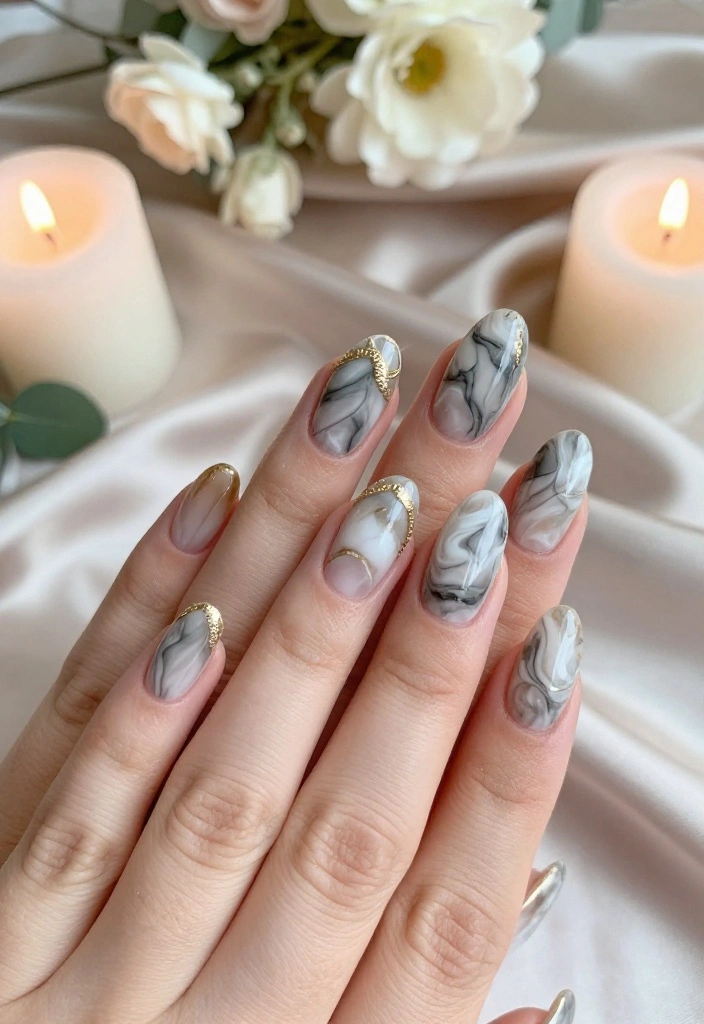
Marble nails mimic the natural beauty of stone, creating a chic and sophisticated appearance. Start with a soft base color and swirl in darker shades using a thin brush to create the marbled effect. This design is not only classy but also uniquely yours!
Pairing it with gold accents can further elevate the look, adding a touch of luxury to your nails.
Key Tips:
– Practice the marbling technique on fake nails for the best results.
– Seal with a top coat to lock in the design.
– Choose colors that resonate with your wedding theme for harmony.
Marbled Effect
Editor’s Choice


20. Timeless Solid Colors
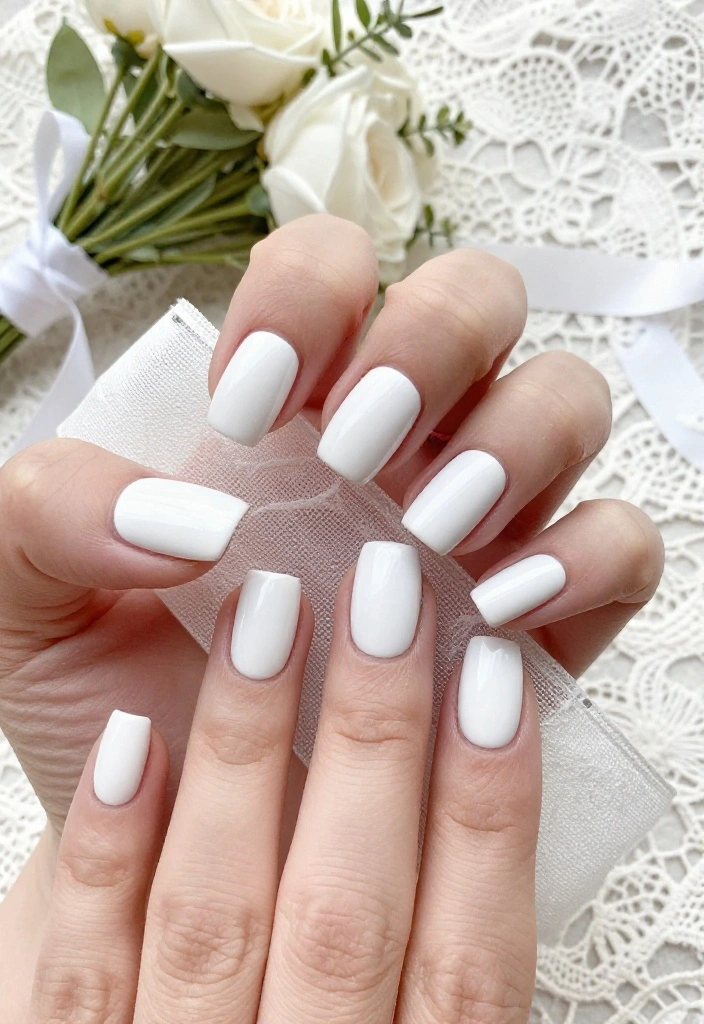
Sometimes, simplicity is the ultimate sophistication! Solid colors can create an elegant and timeless look for your wedding. Opt for classic shades like soft white, nude, light pink, or a bold red, depending on your personal style. This design is easy to maintain while offering a clean and polished appearance.
Be sure to use high-quality polish to ensure longevity and shine throughout your celebration!
Key Tips:
– Choose a color that complements your wedding dress beautifully.
– Keep nails well-groomed for a flawless look.
– Add a glossy top coat for lasting shine and durability.
21. Dreamy Cloud Nails
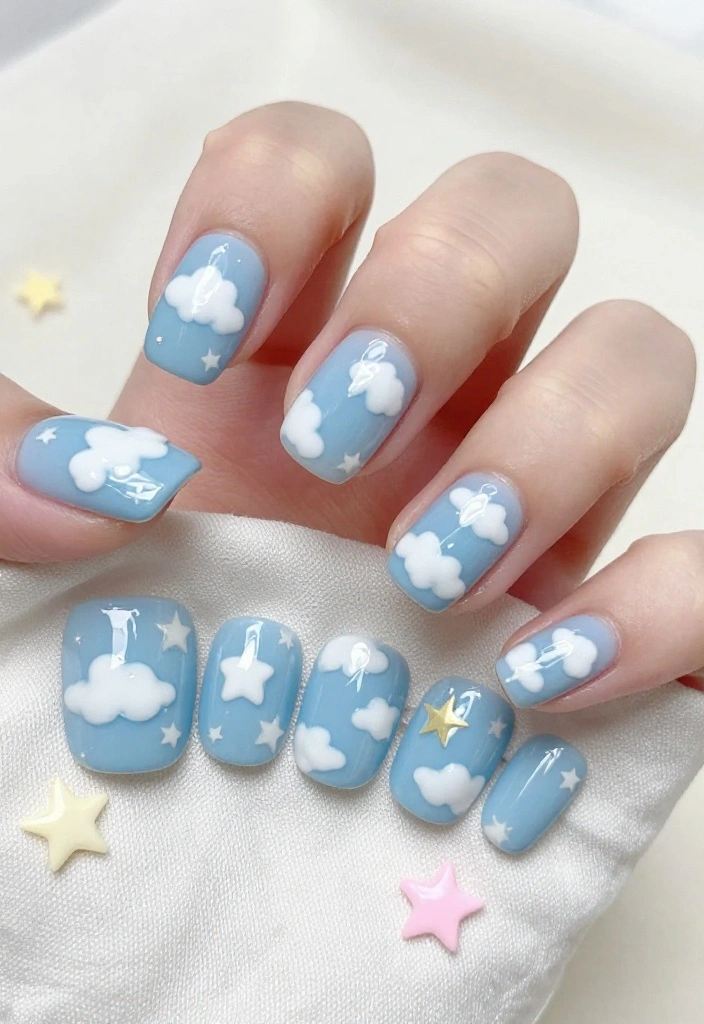
For a whimsical touch, consider dreamy cloud nails on your big day! A light blue base with fluffy white cloud designs creates a playful and joyful look. This design evokes a sense of lightness and happiness, making it perfect for your wedding celebration.
You can even add tiny silver accents or stars for an enchanting effect that captures the magic of your day.
Key Tips:
– Use a sponge for soft blending, especially for the clouds.
– Keep designs small for a more elegant appearance.
– Ensure all layers are dry before adding any detailed elements.
Dreamy Cloud Nails
Editor’s Choice


Conclusion
Your wedding nails are a reflection of your style and personality, and these 21 stunning ideas are just the beginning!
Whether you prefer classic elegance, playful designs, or bold statements, there’s something for every bride.
Experiment with these ideas and find the perfect nail art that will make you feel confident walking down the aisle!
Note: We aim to provide accurate product links, but some may occasionally expire or become unavailable. If this happens, please search directly on Amazon for the product or a suitable alternative.
This post contains Amazon affiliate links, meaning we may earn a small commission if you purchase through our links, at no extra cost to you.
Frequently Asked Questions
Question: What wedding nail art ideas photograph best for the big day?
For the big day, pick a base shade that flatters your skin tone and coordinates with your dress.
Consider a weddinails palette of 2–3 shades to keep the look cohesive.
Opt for photos-friendly designs like a soft French tip, delicate floral decals, or tiny metallic foils. Use gel polish or SNS for durability and chip resistance.
Keep embellishments understated to avoid snagging on fabrics; a single rhinestone on the ring finger or a fine lace-inspired pattern can look stunning in photos. Schedule a trial with a bridal nail artist to ensure the design reads well in pictures and fits your nail length.
Bring reference photos and your wedding theme, and plan a pre-wedding nail care routine: moisturize cuticles, keep nails clean, and avoid harsh solvents the week before. On the day, request a long-lasting top coat and a gentle sealing layer. The result: beautiful, shade-accurate nail art for your weddinails.
Question: Should I DIY my wedding nails or hire a bridal nail artist to do the wedding nail art?
DIY can be a budget-friendly option if you already own gel polishes, but for a flawless, long-lasting look in wedding photos, many brides choose a bridal nail artist who specializes in nail art for weddings.
If you go DIY, schedule a practice session weeks before, choose gel for longevity, and plan a trial run to test wear.
Keep sanitation in mind—sanitize any tools you bring or use clean salon tools.
For more complex designs (embellishments, crystals), a pro can secure pieces so they won’t snag on fabrics. Budget for a bridal package that includes a trial and touch-ups, and share your wedding vibe to align with your bridal style and nail art theme.
Question: How can I pick a wedding nail art design that matches my dress color and theme?
Start by identifying your dress undertones (cool vs warm) and fabric (lace, satin, tulle).
Choose base shades that complement the undertone and align with your weddinails palette. If your dress is ivory, try soft nude or milky white; for champagne, opt for pearly metallics.
Pull in accent colors from your bouquet or jewelry to keep things cohesive. Bring fabric swatches and photo references to your bridal nail artist so designs echo lace, embroidery, or beading. Test runs help ensure the look reads well in photos under wedding lighting, and a simple repeating motif keeps the theme unified across the bridal party.
Question: Which nail shapes work best for wedding nail art and long-lasting wear?
For wedding nail art, soft square or squoval shapes are camera-friendly and practical for long wear.
Almond or oval nails provide a bigger canvas for detailed nail art while maintaining elegance for bridal looks.
Steep stiletto or extreme coffin shapes look dramatic but can be less durable on busy days, so reserve them for extensions if you’re comfortable. If you want drama with ease, opt for gel extensions in a shape you love and top-quality top coat. Always do a trial to see how the chosen shape holds up with your design and daily activities.
Question: How can I care for my wedding nails before and after the big day to keep the look flawless?
Prep nails well in the weeks before your wedding with a strengthening base coat and regular cuticle care.
Moisturize daily and avoid harsh solvents as your date approaches. Schedule a trial and a maintenance fill if you have extensions.
On the wedding day, bring a mini top coat and remover wipes for quick touch-ups and request a durable protective layer from your bridal nail artist.
After the celebration, give your nails a rest, remove gently, and moisturize. With smart pre- and post-care, your nail art can stay polished for photos and memories.
Related Topics
weddinails
bridal nail art
elegant designs
floral patterns
sparkly accents
minimalist style
vintage nails
short nails
easy tutorials
trending nail art
bridal beauty
DIY wedding nails